Chapter 4
Everyone Needs a Dinghy
There are many articles and essays about the relative merits of hard,
inflatable, and rigid inflatable dinghies. You should look for essays by Tom Neale,
Dan Spurr or George Day. They have all said it quite eloquently and I have nothing
to add. Just to summarize, you should consider weight, space and speed over the
water. All three of the cited authors would probably encourage you to have both if
space permits. We have chosen to have both.
Christopher and I built our hard, nesting dinghy from a stitch and glue design
by Danny Greene. N.A. We chose a nesting dinghy so that we can get it up on the
foredeck when at sea. On the trip I made on the Pearson 424 from Tortola to
Chesapeake Bay we had the hard dinghy up on the coach roof between the main traveller and
the mast. This limited forward vision some, but when you are off shore there isn't
much to see up ahead anyway. At night you are either riveted to the compass or so in
awe of the abundance of stars that the limited vision ahead doesn't matter.
It took us four or five months over the winter of 1991-1992. Be careful
where you choose to build your dinghy. Make sure you can get it out of the basement
( I checked before we started). Be sure that the space is ventilated, naturally or
by a fan. Finally, make sure that you can tie up the space with a boat building
project. Poor Maria had to climb around the project whenever she wanted to get
to the washer and dryer. She never complained, but then she didn't ask what we were
planning to build next.
There is a good article by Danny Greene in the August 1991 issue of Cruising
World about the boat we built to his design.
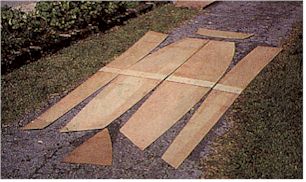 In this picture the boat has been lofted
from 4x8 sheets of marine grade plywood and the basic hull forms cut out. lofting
involves drawing out the shapes on a piece of plywood which has already been covered with
a grid like graph paper. Christopher, who was 10 at the time, was a big help with
the lofting. You really need some extra hands to keep the fairing strips to a nice
smooth curve and through the requisite points on the grid. With a careful
inventorying of his fingers and toes before and after, he also helped with the
sawing. Once all of the hull pieces have been cut out they are stitched together
with 100-lbs. test monofilament fishing line. Once the boat is stitiched together
it is important to make sure that it is "square", or true. The distance to
diagonal corners should be the same for both pairs. When the boat is upside down all
four corners should touch the floor and the height of the gunnel at midships should be the
same on both sides. When you have pulled the boat into square resin is then used to
build fillets in all of the joints. The next step is to glass over the joints inside
and out.
In this picture the boat has been lofted
from 4x8 sheets of marine grade plywood and the basic hull forms cut out. lofting
involves drawing out the shapes on a piece of plywood which has already been covered with
a grid like graph paper. Christopher, who was 10 at the time, was a big help with
the lofting. You really need some extra hands to keep the fairing strips to a nice
smooth curve and through the requisite points on the grid. With a careful
inventorying of his fingers and toes before and after, he also helped with the
sawing. Once all of the hull pieces have been cut out they are stitched together
with 100-lbs. test monofilament fishing line. Once the boat is stitiched together
it is important to make sure that it is "square", or true. The distance to
diagonal corners should be the same for both pairs. When the boat is upside down all
four corners should touch the floor and the height of the gunnel at midships should be the
same on both sides. When you have pulled the boat into square resin is then used to
build fillets in all of the joints. The next step is to glass over the joints inside
and out.
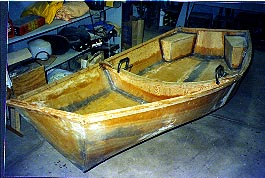 The hull has been glued up and
glassed. The boat is shown in the photo to the right. The center bulkhead is the join
point for the two halves. Eventually there will be four stainless steel bolts used
to keep the two halves together. The aft seats are air tight and provide flotation.
The bow will have a small locker built into it.
The hull has been glued up and
glassed. The boat is shown in the photo to the right. The center bulkhead is the join
point for the two halves. Eventually there will be four stainless steel bolts used
to keep the two halves together. The aft seats are air tight and provide flotation.
The bow will have a small locker built into it.
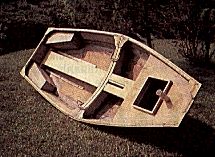 The boat is just about completely
assembled. We made one change to the design which we feel improves the strength of
the boat. On the outside face of the aft bulkhead on there is a block of wood which
fits into the dagger board slot. The original plans called for this slot to be
completely open on the vertical and horizontal faces. We glassed in a piece of
wood and reduced the size of the block on the aft bulkhead. The tube in the bow is
for the mast. The strips running along the bilge are backing plates for the twin
skegs. The stern will have reinforcing plates for mounting an outboard motor.
The boat is just about completely
assembled. We made one change to the design which we feel improves the strength of
the boat. On the outside face of the aft bulkhead on there is a block of wood which
fits into the dagger board slot. The original plans called for this slot to be
completely open on the vertical and horizontal faces. We glassed in a piece of
wood and reduced the size of the block on the aft bulkhead. The tube in the bow is
for the mast. The strips running along the bilge are backing plates for the twin
skegs. The stern will have reinforcing plates for mounting an outboard motor.
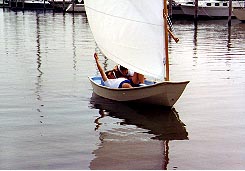 Christopher and I are taking Chris'Craft
on her maiden voyage at Great Oak Landing in Maryland. The sail is trapezoidal in
shape and has about 80 sq. ft. in it. The boat draws less than three feet with the
board down and 6 inches with it up. We can stow the mast and either row the boat or
put a small outboard on the stern.
Christopher and I are taking Chris'Craft
on her maiden voyage at Great Oak Landing in Maryland. The sail is trapezoidal in
shape and has about 80 sq. ft. in it. The boat draws less than three feet with the
board down and 6 inches with it up. We can stow the mast and either row the boat or
put a small outboard on the stern.
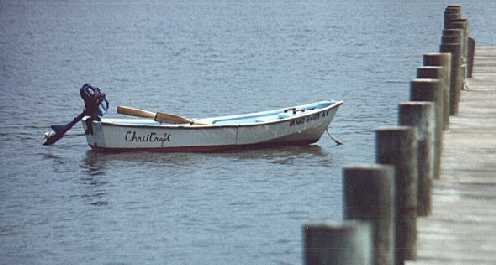 At right she is prepared to run
about under power. We have a little Nissan 2.5hp on the back. This motor is
also suitable for the inflatable dinghy. The oars are collapsible for easy stowing
in the stern lazarette. The oars are useful on those occasions when you run out of
gas.
At right she is prepared to run
about under power. We have a little Nissan 2.5hp on the back. This motor is
also suitable for the inflatable dinghy. The oars are collapsible for easy stowing
in the stern lazarette. The oars are useful on those occasions when you run out of
gas.
We have sailed this little dinghy in a number of anchorages of Chesapeake Bay.
It has been a head turner everywhere.
A consideration to keep in mind when choosing a dinghy is that any towed boat
creates a lot of drag. You will consume more fuel when motoring and not make as good
time when you sail.
On Board Boats: Table of Contents
Comments and Correspondence